


To pick the right component for your gas system, you must match the hole density and material thermal rating to your burner’s specific BTU output, so the plate delivers reliable, even heat. This guide explains how to verify compatibility, select the correct size, and install the plate to ensure safe operation without damaging your equipment.
Selecting the right honeycomb burner plate
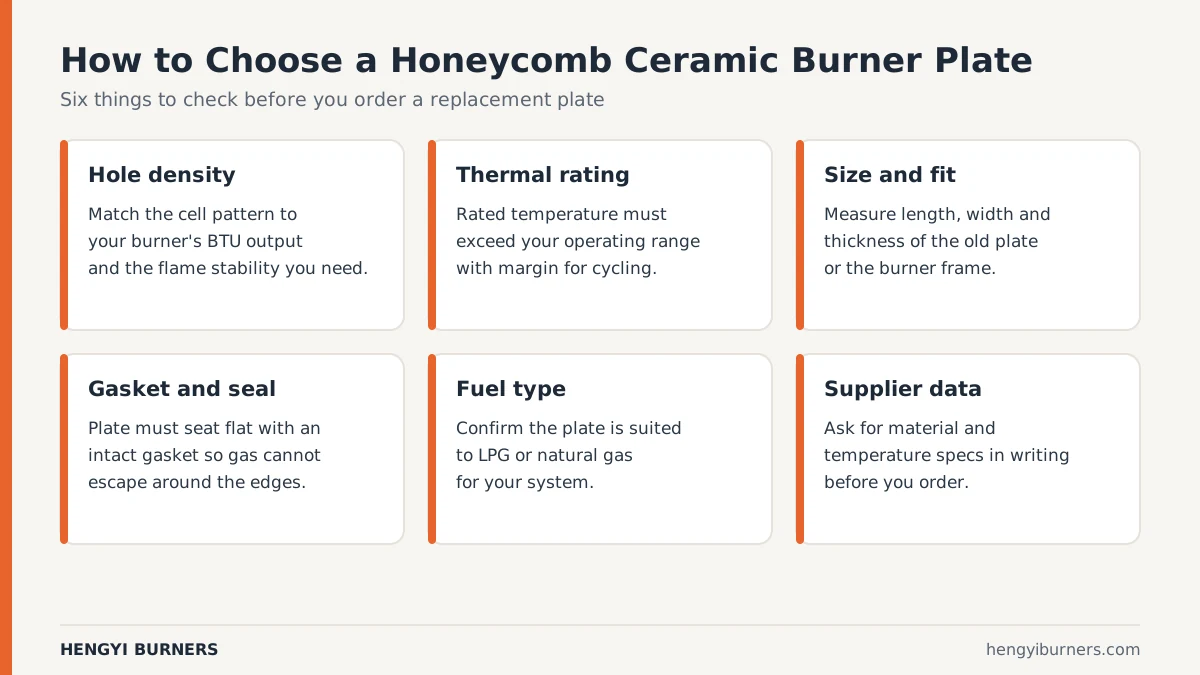
A honeycomb ceramic burner plate is a porous, heat-resistant component designed to stabilize gas flames and improve combustion efficiency in infrared heaters and industrial burners. These plates feature thousands of tiny channels that allow a premixed gas-air supply to reach the surface, where it burns cleanly and produces intense, even infrared radiation.
The primary benefit is the conversion of gas energy into high-temperature radiant heat, which is significantly more efficient than open-flame heating. People often mistakenly believe that any plate of the same outer dimensions will work in any heater. However, the internal structure—specifically the hole density and the ceramic composition—must be calibrated to the gas pressure and flow rate of your specific burner.
Using a plate that’s too dense for your gas pressure can cause “backfiring,” where the flame travels inside the burner body, potentially melting internal parts or causing a fire. Conversely, a plate with holes that are too large will lead to incomplete combustion and the release of dangerous carbon monoxide.
The decision rule is simple: if your burner produces a yellow, flickering flame, your plate density is likely too low for the current fuel mixture. If the burner makes a popping sound upon ignition, your plate is likely too dense, creating excessive backpressure. Always verify the manufacturer’s technical specifications for gas appliances to ensure your replacement part meets the required safety standards for your specific heating unit.
Installing the Burner Component
Follow these steps to replace or install your plate. If your unit is under warranty, consult the manufacturer before opening the burner housing, as unauthorized work may void your coverage.
- Turn off the gas supply at the main valve and ensure the burner is completely cool to the touch.
- Remove the protective grill or outer casing using a standard screwdriver, keeping track of all screws.
- Loosen the retaining clips or the high-temperature gasket holding the old plate in place.
- Carefully lift out the old plate, noting the orientation of the gas-inlet side versus the fire-surface side.
- Clean the burner housing seat of all debris, dust, or old gasket material, as a rough surface will cause gas leaks.
- Place the new plate into the housing, ensuring it sits perfectly flush against the gasket to prevent bypass.
- Tighten the retaining clips evenly in a cross pattern to ensure equal pressure across the ceramic surface.
- Reinstall the protective grill and perform a leak test using a soap-and-water solution on all connections before relighting.
The most important judgement call is ensuring the seal is airtight. If the plate wobbles or if you see gaps between the ceramic and the metal housing, the flame will bypass the intended path, which leads to localized overheating and premature failure of the ceramic material.
Required Plate Specifications
This table assumes standard atmospheric burners. For high-pressure systems, you must consult the manufacturer’s manual to match the specific ceramic grade to your system’s maximum temperature rating.
The primary mistake users make is choosing a high-density plate for outdoor use. These plates trap moisture and debris, leading to rapid cracking during freeze-thaw cycles. If you see soot buildup, switch to a lower density immediately.
Use this decision rule to ensure longevity: if your burner operates above 1,800°F, you must choose Alumina to prevent structural warping. If you’re operating below 1,200°F, Cordierite is the superior choice because it handles rapid temperature fluctuations without shattering.
Always measure your burner face before ordering. A plate that’s even 3mm too small will cause gas leakage around the edges, creating a dangerous flare-up risk. If the plate doesn’t fit flush, don’t attempt to shim it with metal washers.
Achieving Consistent Performance
Experienced technicians succeed by focusing on the “burn-in” process rather than just the physical fit. When you install a new plate, the ceramic often contains microscopic moisture or binder residues from the manufacturing process. If you ignite the burner at full power immediately, you risk thermal shock, which causes the ceramic to crack or shatter. Instead, run the burner at its lowest setting for 30 minutes to slowly drive out moisture.
Another detail that separates a professional installation from a failure is the state of the gasket. People often reuse old, brittle gaskets because they look “mostly fine,” but a compromised gasket allows gas to escape around the edges of the plate. This creates a hot spot that will melt your housing or cause the burner to lose its infrared efficiency. Always replace the gasket whenever you handle the plate. Finally, never touch the surface of the new plate with bare, oily hands.
Common Troubleshooting Steps
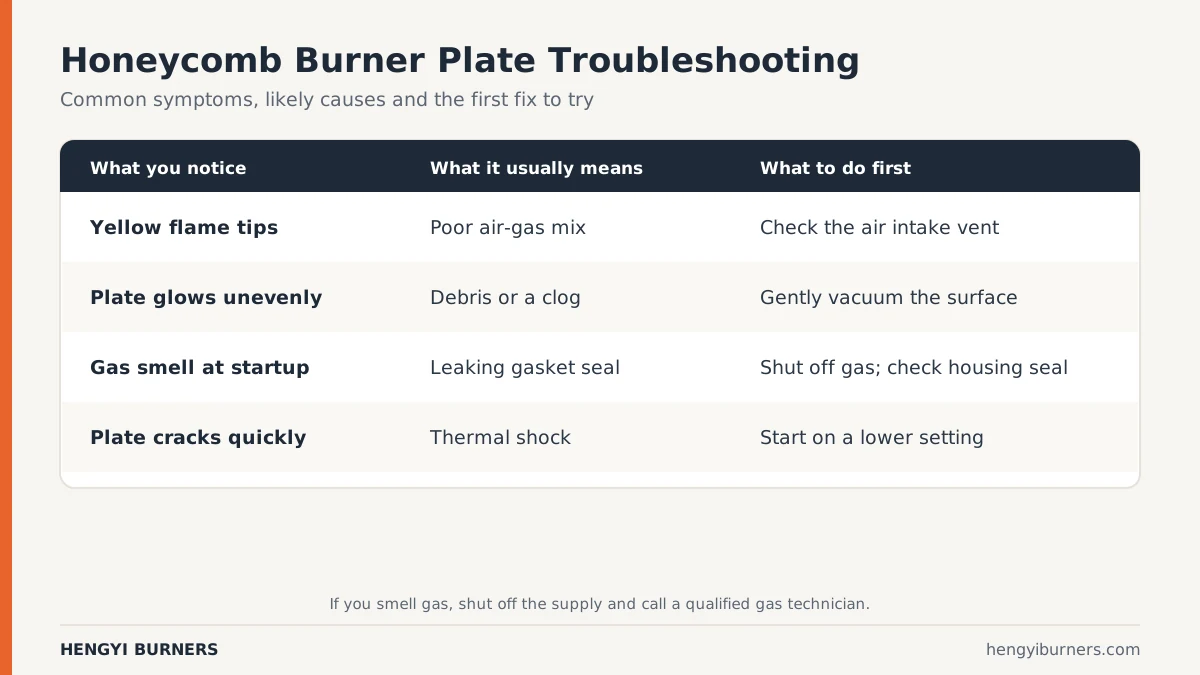
| What you notice | What it usually means | What to do first |
|---|---|---|
| Yellow flame tips | Poor air-gas mix | Check the air intake vent |
| Plate glows unevenly | Debris or clog | Gently vacuum the surface |
| Gas smell at startup | Leaky gasket seal | Tighten housing clips |
| Plate cracks quickly | Thermal shock | Use a lower initial setting |
If you smell gas after tightening the housing, don’t attempt to light the burner. Close the gas valve immediately and contact a certified gas technician to inspect the assembly for leaks.
Most users mistakenly assume a yellow flame indicates a gas pressure issue. It’s almost always an oxygen deficiency. If the vent is clear but the flame remains yellow, check for spider webs or dust inside the burner tube. These blockages prevent the necessary air-to-fuel ratio.
When dealing with plate cracks, look for a pattern. If the crack is jagged and runs through the center, you likely applied high heat too rapidly. If the crack is small and near the edges, the plate was likely overtightened during installation. If you’re unsure, err on the side of a looser fit to prevent permanent structural failure.
Regulatory and Safety Rules
Safety standards for gas-fired equipment are strictly enforced to prevent carbon monoxide buildup and fires. In the United States, the American National Standards Institute (ANSI) sets the requirements for gas-fired infrared heaters, ensuring that components like ceramic plates meet durability and thermal expansion criteria.
If you’re operating a commercial kitchen or industrial facility, you must verify that your replacement parts comply with local fire codes and manufacturer-approved specifications. A common mistake is sourcing generic ceramic plates based solely on dimensions. This error often costs facility managers thousands in fines or, worse, triggers a localized gas leak.
Never attempt to modify the hole size or shape of a plate to “improve” performance. This changes the combustion chemistry and can lead to dangerous levels of carbon monoxide. If your burner requires a specific plate size that’s no longer manufactured, you must replace the entire burner unit rather than attempting to fabricate a custom ceramic insert. Always check the serial plate for the specific model number before installation.
Maintenance and Long-Term Care
Once installed, your ceramic plate requires minimal attention, but keeping it clean is vital for longevity. If you notice a buildup of dust or soot, use a soft-bristled brush or a vacuum on the lowest setting to gently clear the pores.
Never use water or liquid cleaners. These liquids soak into the porous ceramic and turn into high-pressure steam when heated, which will cause the plate to explode. If you accidentally spill liquid on the unit, let it air dry for at least 48 hours before attempting to fire it.
The plate should last for several years with regular use, but the exact lifespan varies by model. Check the label for the manufacturer’s estimated cycle count. If you see deep cracks or missing chunks of ceramic, stop using the unit immediately. These indicate structural failure. The plate must be replaced before the next use to prevent uncontrolled flame propagation, which can damage the surrounding housing or pose a fire risk.
When to Use Alternatives
This component is designed for infrared radiant heat, not for direct flame cooking or high-moisture environments. If you’re building a system that requires direct contact with food or high-moisture exhaust, a honeycomb ceramic plate is the wrong choice because grease or water will clog the pores and ruin the material. In these cases, consider using a metal flame spreader or a cast iron burner grate, which are easier to clean and resistant to liquid spills. Similarly, if your application involves high-vibration environments, such as a mobile food truck, the ceramic plate may crack prematurely. A heavy-duty metallic burner is a much better choice for equipment that moves frequently, as it can withstand mechanical shock far better than brittle ceramic materials.
Can I clean a honeycomb ceramic burner plate with water?
No, you should never use water or liquid cleaners on a ceramic burner plate. Moisture absorbs into the porous material and will cause the plate to crack or shatter when the burner is heated.
Why is my new burner plate cracking after one use?
It’s likely suffering from thermal shock caused by heating the plate to maximum temperature too quickly. Always perform a 30-minute low-heat burn-in to remove moisture and allow the ceramic to expand gradually.
How do I know which plate size I need?
You must measure the physical dimensions of your existing plate and match the specific BTU rating provided in your heater’s manual. Using the wrong size will lead to gas leaks or improper combustion.
Is it safe to use a damaged ceramic plate?
No, you must replace the plate if it has cracks or missing sections. A damaged plate can’t provide the proper back-pressure for safe combustion, which can lead to fires or dangerous gas buildup.
How often should I replace the burner plate?
The lifespan varies by model—check the label for the manufacturer’s guidance on service intervals. With clean fuel and proper maintenance, many plates last for years, but you should inspect them annually for signs of wear or structural damage.
Selecting the right plate ensures your heater runs at peak efficiency. By focusing on the manufacturer’s requirements and following a slow burn-in process, you’ll keep your system safe and effective for years to come.
Choosing a Honeycomb Plate: Summary
Once your new plate is securely in place, take a moment to perform a leak test before firing up the system. You’ll want to monitor the flame color closely during the first few hours of use. If everything looks steady and blue, you’re ready to enjoy consistent, efficient heat for years.
Get the Right Parts from Hengyi Burners
Hengyi Burners manufactures infrared gas burners and burner components in Zhaoqing, China. We make honeycomb ceramic burner plates as well as complete infrared gas burners. Contact our team with your fuel type, supply pressure and heating area, and we will recommend a setup and send a quote.
Related guides
4 thoughts on “How to Choose a Honeycomb Ceramic Burner Plate for Your System”