

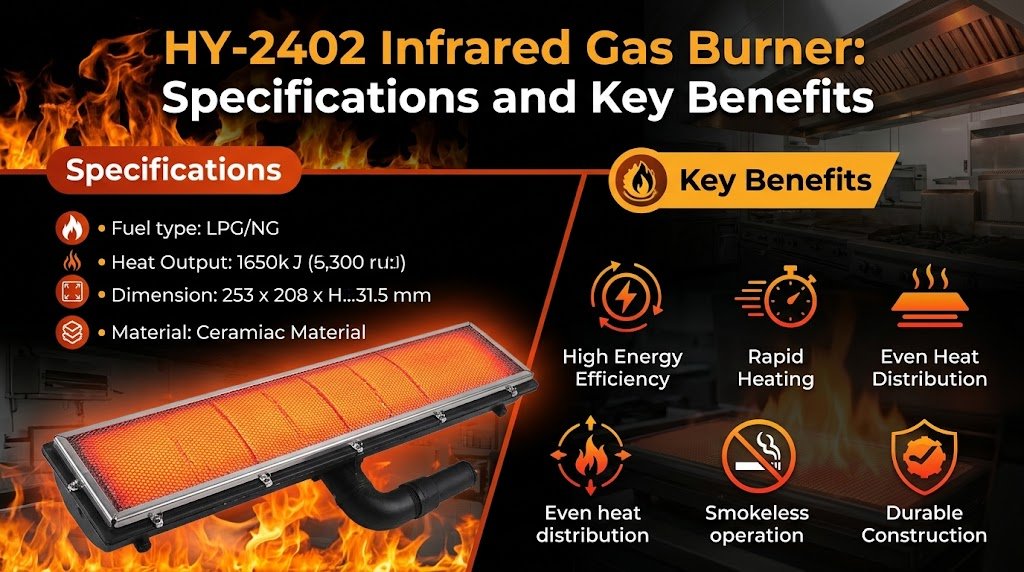
The HY-2402 infrared gas burner provides high-efficiency heat transfer by converting gas energy into infrared radiation, which directly warms objects rather than the surrounding air. This device uses a ceramic plate with thousands of tiny holes to create a flameless, glowing surface that reaches high temperatures quickly. It’s commonly used in industrial drying, food processing, and heating systems where precise, even thermal output is needed. By minimizing convective heat loss, the burner improves energy usage compared to traditional open-flame systems, making it a reliable tool for professional thermal applications.
HY-2402 Specifications at a Glance
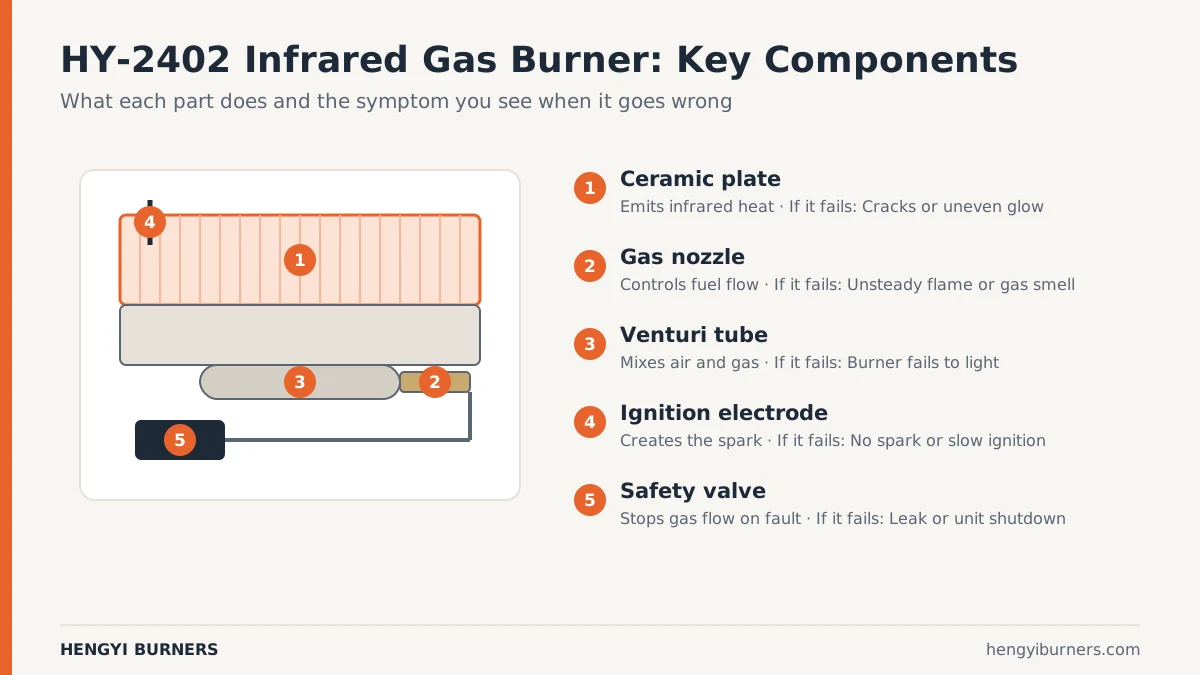
| Part or input | What it does | What you notice when it goes wrong |
|---|---|---|
| Ceramic plate | Emits infrared heat | Surface cracks or uneven glow |
| Gas nozzle | Controls fuel flow | Inconsistent flame or gas smell |
| Venturi tube | Mixes air and gas | Burner fails to light properly |
| Ignition electrode | Creates the spark | No spark or delayed ignition |
| Safety valve | Stops gas flow | Gas leaks or unit shutdown |
What happens, step by step
- The gas supply enters the venturi tube, where it draws in the necessary amount of air based on the ANSI Z83.26 standards for gas-fired infrared heaters. This mixing process happens in milliseconds, ensuring the fuel-to-air ratio is correct before reaching the ceramic plate.
- The ignition electrode produces a high-voltage spark near the burner surface, which ignites the gas-air mixture trapped in the tiny ceramic ports. This step typically takes under three seconds if the gas lines are purged and the pressure is set to the manufacturer’s specified range.
- Once ignited, the ceramic plate begins to glow a deep, consistent red as it reaches its operating temperature, usually between 800 and 900 degrees Celsius. This heat intensity depends on the gas pressure, so check your model’s data plate to confirm the correct pressure settings for your specific region.
- The surface emits infrared rays that travel in a straight line to strike the target object, heating it directly while having a minimal effect on the temperature of the surrounding air. This process is nearly instantaneous, providing uniform heating across the target area while maintaining high thermal efficiency during operation.
- A thermocouple or flame sensor monitors the heat output to ensure the burner remains lit throughout the cycle. If the sensor detects a drop in temperature, it sends a signal to the safety valve to stop the gas flow immediately to prevent unburned gas from escaping into the space.
- The system maintains this constant infrared output as long as the gas supply and air intake remain unobstructed. If you notice the glow fading or turning yellow, it suggests a blockage in the air intake or a change in gas pressure that requires immediate inspection of the burner components.
Why this matters when something goes wrong
When an infrared burner fails to produce the expected heat, the root cause is almost always an imbalance in the fuel-air mixture. The burner relies on a precise mix to achieve surface combustion; if there’s too much air, the flame lifts off the ceramic, while too little air causes incomplete combustion and soot buildup. This soot blocks the tiny pores on the ceramic plate, which prevents the infrared energy from escaping and can cause the burner to overheat internally. You should check the air intake ports for dust or debris before blaming the gas regulator, as blocked air paths are the most common reason for a loss of efficiency.
If the burner won’t light, the fault usually lies with the ignition sequence or gas pressure. A weak spark from the electrode often fails to bridge the gap if the burner surface is damp or dirty. You must ensure the electrode tip is clean and positioned exactly as shown in the installation manual. If the spark is strong but the burner remains cold, the gas valve is likely closed or the supply pressure has dropped below the ISO 23551-1 safety requirements for gas burners. Never attempt to bypass safety sensors to force a start, as this risks a dangerous buildup of gas. If the unit still refuses to ignite after cleaning the electrode and confirming the gas supply, consult a qualified technician. Attempting to repair internal gas valves or ceramic plate seals without proper training can void your warranty and create significant fire hazards. Professional service is required once basic cleaning fails to resolve the ignition issue.
What you can change, and what you cannot
Things you can change
- Gas pressure settings using the external regulator.
- The distance between the burner and the target object.
- Cleaning the ceramic surface to remove dust buildup.
- Adjusting the air intake shutters for local altitude.
Things you can’t change
- The maximum thermal output defined by the ceramic size.
- The internal structure of the venturi mixing chamber.
- The safety shut-off timing set by the manufacturer.
- The material composition of the heat-emitting plate.
Getting more out of it
Consistent performance requires regular maintenance of the burner environment. First, keep the area surrounding the air intake clear of dust and grease. Even a thin layer of particulate matter can disrupt the air-fuel ratio, causing the burner to run cooler than intended. If you operate in a dusty environment, consider installing an external air filter to protect the intake.
Second, monitor the color of the ceramic glow. A healthy burner glows a uniform, bright orange-red. If you see blue flames dancing on the surface, the gas pressure is likely too high, which can damage the ceramic over time. Adjust the regulator until the blue flame disappears and the surface glows evenly.
Third, verify the gas type matches your burner model. Using propane on a system designed for natural gas will cause excessive heat and potential structural failure of the ceramic plate. Always confirm your fuel source against the official manufacturer technical documentation provided with your specific unit.
Finally, allow the burner to reach full operating temperature before placing your target material under it. This ensures the heat radiation is stable and prevents uneven heating of your product. If the burner cycles on and off, check that the thermostat or sensor is calibrated to the burner’s response time.
Frequently asked questions
Can I clean the ceramic plate with water?
No, never use water to clean the ceramic plate because it causes the material to crack or shatter when heated. The porous ceramic absorbs moisture that expands rapidly as steam during operation. Use low-pressure compressed air to remove dust from the ports.
How long does the ceramic plate last?
The ceramic plate typically lasts several thousand hours when maintained correctly. Factors such as frequent thermal cycling, vibration, and airborne pollutants will shorten its lifespan. Replace the plate immediately if you notice visible cracks or crumbling edges.
Is it safe to operate this burner in a small room?
No, it isn’t safe to operate an infrared gas burner in a small, enclosed room without proper ventilation. These burners consume oxygen and produce combustion gases that can be hazardous. Always ensure your workspace has an active exhaust system or constant fresh air.
Why is the burner making a loud whistling sound?
A whistling sound usually indicates an obstruction in the gas nozzle or gas flow exceeding the burner’s design limits. Check the gas pressure at the regulator to ensure it matches the nameplate rating. If the pressure is correct, inspect the nozzle for debris.
Does it matter if the burner is tilted?
Yes, the burner must be installed in the orientation specified by the manufacturer to ensure the venturi tube functions correctly. Most infrared burners require a specific position to maintain a consistent gas-air mixture. Always check the installation guide to ensure proper alignment.
How do I know if the gas pressure is too low?
A failing burner often appears dim or patchy instead of reaching its full glowing color. Low pressure prevents gas from reaching all ceramic ports, resulting in cold spots. Use a calibrated manometer to confirm the pressure matches the burner’s data plate.
Final Thoughts
Switching to this technology is a smart move if you’re looking to lower your energy costs and improve production quality. You’ll find that it’s easy to integrate into your current setup once you’re ready to upgrade. Contact Hengyi Burners to confirm how the HY-2402 fits your line.
Get the Right Parts from Hengyi Burners
Hengyi Burners manufactures infrared gas burners and burner components in Zhaoqing, China. See the HY-1602 infrared gas burner and HY-2402 infrared gas burner, or browse all infrared gas burners. Contact our team with your fuel type, supply pressure and heating area, and we will recommend a setup and send a quote.
Related guides
3 thoughts on “HY-2402 Infrared Gas Burner: Specifications and Key Benefits”