

The ignition needle on an industrial gas burner is a small, inexpensive part that decides whether the burner lights reliably or shuts down on lockout — and choosing the right one comes down to matching its material, tip geometry, length, and mounting style to your specific burner, fuel, and ignition system. Get those four variables right and you’ll get years of dependable sparking; get them wrong and you’ll be replacing electrodes monthly while chasing intermittent flame failures.
Key Takeaways
- Match the alloy to the heat: Kanthal and silicon carbide handle radiant and high-temperature zones; Inconel and stainless steel suit cooler flame-supervision duty.
- Tip geometry matters more than length: a sharp, correctly gapped point produces a stronger spark than a long needle with a worn or rounded tip.
- Verify the gap before you buy: most industrial spark gaps run between 1/8 in. and 3/16 in., but your burner manual is the final word.
- Mounting style must match the holder: threaded, flanged, and push-in electrodes aren’t interchangeable without an adapter.
- Insulator material sets the temperature ceiling: alumina ceramic is standard, but high-alumina or sapphire insulators are needed above roughly 2,000°F.
- Buy from the burner OEM or a named distributor: unbranded needles often have inconsistent alloy and tip geometry that cause repeat lockouts.
What an Ignition Needle Actually Does
An ignition needle — also called an electrode, spark probe, or igniter rod — sits at the burner’s pilot or main flame location and carries a high-voltage pulse from the ignition transformer to a precise point in space. When that pulse jumps the gap between the needle tip and the ground electrode (or the burner’s grounded metal body), the arc ignites the gas-air mixture.
Three things have to happen for that to work reliably. The needle must conduct the voltage without excessive loss, the insulator must prevent the voltage from shorting to the burner housing, and the tip must hold a consistent gap so the spark lands where the gas is. A needle that fails any of these three jobs produces the classic symptoms: weak spark, no spark, or spark in the wrong place.
Because the needle sits inside the combustion zone, it also has to survive heat, thermal cycling, and chemical attack from the flame. That’s why material selection isn’t a cosmetic choice — it determines service life.
Match the Needle Material to the Heat
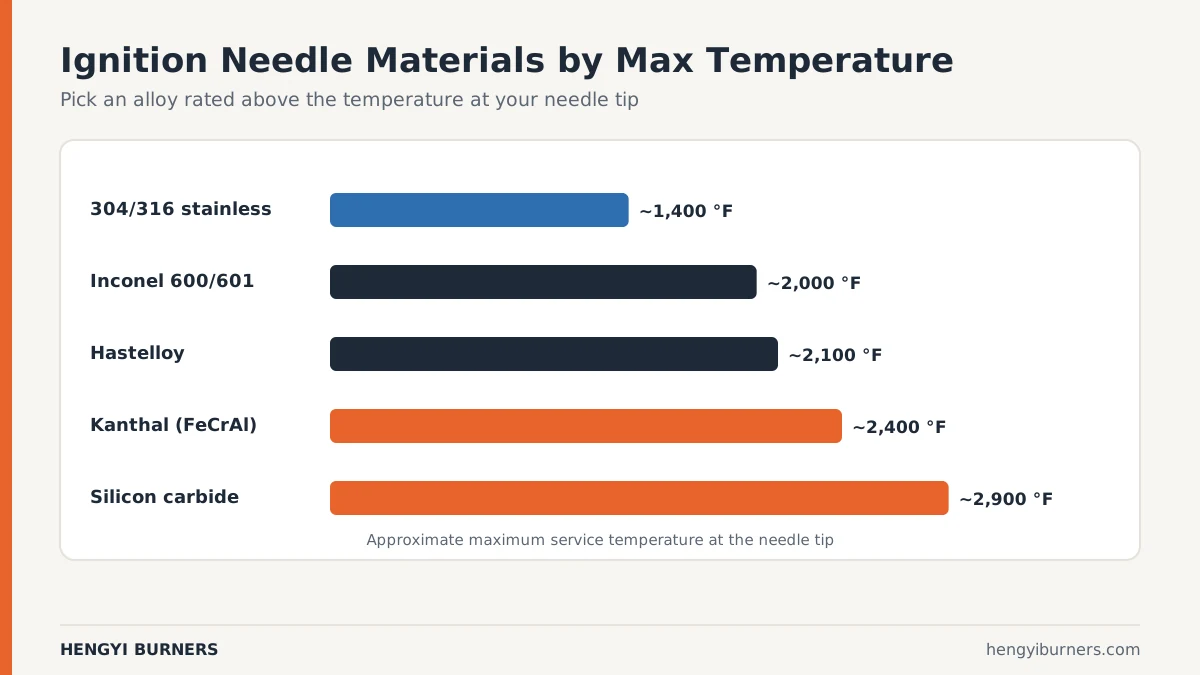
The single biggest cause of premature needle failure is using the wrong alloy for the temperature and atmosphere at the tip. Here’s how the common materials compare.
| Material | Typical Max Service Temp | Best For | Watch Out For |
|---|---|---|---|
| 304/316 stainless steel | ~1,400°F | Cooler flame-supervision and pilot duty | Oxidation and scaling in radiant zones |
| Inconel 600/601 | ~2,000°F | High-temperature pilots, cycling burners | Higher cost, harder to form tips |
| Kanthal (FeCrAl) | ~2,400°F | Radiant tubes, direct-flame ignition | Brittle after long service |
| Silicon carbide | ~2,900°F | Furnace and kiln burners, extreme heat | Very brittle, needs careful handling |
| Hastelloy | ~2,100°F | Corrosive or sulfur-bearing fuels | Expensive, long lead times |
Stainless steel is the default for many packaged burners because it’s cheap and adequate in cooler locations. Inconel and Kanthal are the workhorses when the needle tip sits directly in the flame path. Silicon carbide shows up in high-temperature process burners where metal electrodes simply won’t survive.
If you’re unsure which alloy your burner was designed around, check the OEM’s parts list before substituting. A needle that’s metallurgically “better” but dimensionally different can change the spark gap and cause new problems.
Understand Tip Geometry and Gap
The tip is where the spark is born, and its shape controls how reliably that happens.
Pointed vs. rounded tips
A sharp point concentrates the electric field, which lowers the voltage needed to jump the gap. That’s why new needles light easily and worn ones don’t — as the tip erodes and rounds off, the required voltage climbs until the transformer can’t keep up.
Gap distance
The gap between the needle tip and ground is the most commonly misadjusted dimension. Too wide and the transformer can’t jump it; too narrow and the spark is weak or the flame can bridge and short the circuit. Most industrial burners specify a gap in the 1/8 in. to 3/16 in. range, but packaged burners vary. Always set the gap with a feeler gauge to the OEM’s number, not by eye.
Spark direction
Some needles are designed to spark to a dedicated ground rod, others to the burner’s metal body. If you replace a needle with one designed for the other configuration, the spark may jump to the wrong surface and ignite poorly — or not at all.
Choose the Right Length and Reach
Length determines whether the needle tip sits in the correct ignition zone. A needle that’s too short won’t reach the gas; one that’s too long can contact the burner throat, short out, or sag when hot.
Measure the insertion depth — the distance from the mounting face to the tip — not the overall length. Then compare it to the OEM specification. If you’re replacing a needle and the original is unavailable, measure the old one before it’s discarded, including any bend or offset in the rod.
Pro Tip: Photograph the old needle next to a ruler before you remove it. Tip geometry, bend angle, and insertion depth are far easier to match from a photo than from memory.
Insulator Material Sets the Temperature Ceiling
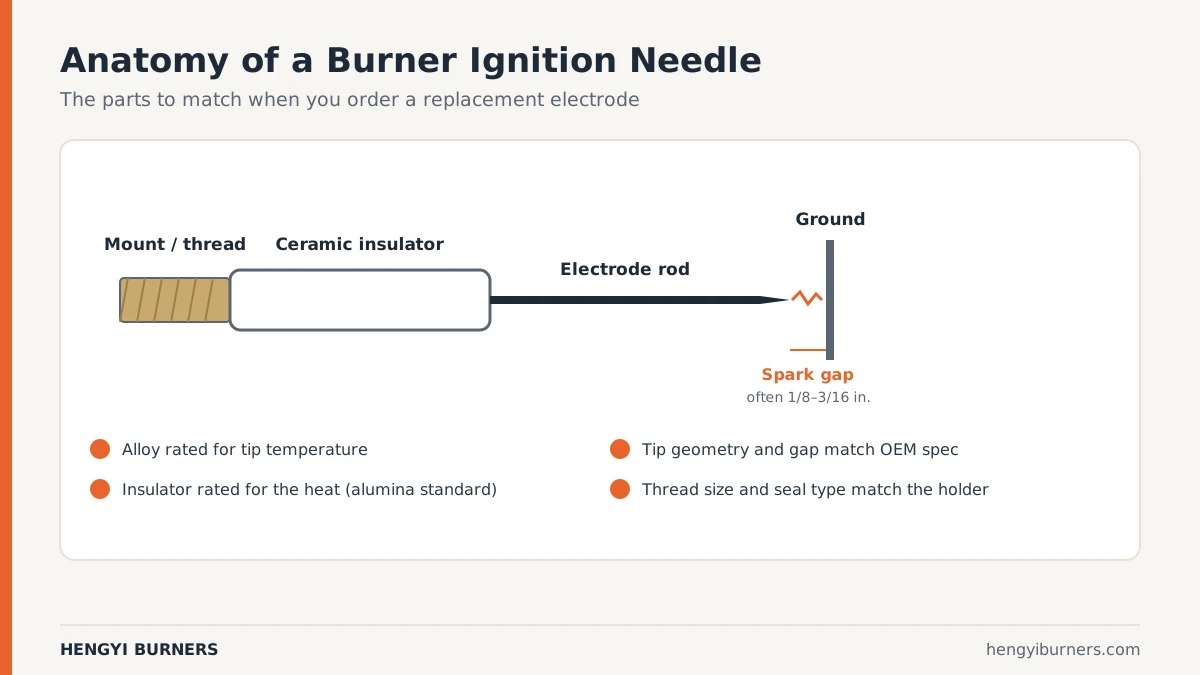
The ceramic insulator around the electrode does two jobs: it holds the needle rigid and it isolates the high voltage from the grounded burner body. Standard alumina ceramic (typically 95–99% alumina) covers most applications. Above roughly 2,000°F at the insulator, you need high-alumina or, in extreme cases, sapphire insulators.
Insulator failure usually shows up as a hairline crack or a conductive carbon track down the surface. Once that track forms, the voltage leaks to ground and the spark weakens or disappears. If you’re replacing needles frequently and the tips look fine, inspect the insulators — that’s often where the real problem is.
Match the Mounting Style to the Holder
Needles mount in several ways, and they aren’t interchangeable without the correct adapter.
| Mounting Style | How It Attaches | Common On |
|---|---|---|
| Threaded | Screws into a tapped boss | Most packaged burners |
| Flanged | Bolts to a flange with a gasket | Larger process burners |
| Push-in / compression | Held by a compression fitting | Retrofit and OEM-specific designs |
| Bayonet | Twists and locks into a socket | Some European burner designs |
Check the thread size and pitch (e.g., 1/4 NPT, 3/8 NPT, or metric) and the seal type — some mounts rely on a metal-to-metal seat, others on a gasket or O-ring. A mismatched thread will either not seal (leaking gas into the electrode cavity) or cross-thread and ruin the boss.
Step-by-Step Selection Checklist
Work through these steps in order before ordering.
- Identify the burner make and model. Pull the nameplate data — OEM, model, serial number, and fuel type.
- Find the OEM part number for the electrode in the burner manual or parts list.
- Measure the old needle if the part number is unavailable: insertion depth, rod diameter, tip shape, bend angle, and thread size.
- Confirm the alloy against the burner’s temperature and atmosphere.
- Verify the spark gap from the manual, and note whether it sparks to a ground rod or the burner body.
- Check the insulator type and temperature rating.
- Match the mounting style and seal.
- Order from the OEM or a named distributor who can confirm the specification.
Common Mistakes That Cause Repeat Failures
- Buying on length alone. Two needles the same length can have completely different tip geometry and alloy.
- Ignoring the gap. A new needle installed at the wrong gap will fail just like the old one.
- Substituting a “close enough” alloy. A stainless needle in a 2,000°F radiant zone may last weeks, not years.
- Reusing a damaged insulator. Cracks and carbon tracks cause voltage leakage that looks like a transformer problem.
- Mixing up spark-to-ground configurations. The needle must match how the burner grounds its spark.
- Skipping the OEM cross-reference. Aftermarket needles vary widely in quality; a cheap one can cost more in downtime than it saves.
Warning: Always isolate and lock out the burner’s gas and electrical supply before removing or installing an ignition needle. The ignition transformer produces high voltage even when the burner appears off.
When to Replace vs. When to Adjust
Not every ignition problem needs a new needle. Adjust the gap and clean the tip first if the needle is otherwise in good condition. Replace the needle when you see:
- A rounded, eroded, or pitted tip that no longer holds a sharp point
- A cracked, chipped, or carbon-tracked insulator
- A bent or sagging rod that won’t hold its position
- Visible corrosion, scaling, or alloy degradation
- Repeated lockouts after the gap and transformer have been verified
If the burner still won’t light after a new, correctly gapped needle is installed, the problem is likely upstream — transformer output, flame safeguard, gas pressure, or air-fuel ratio. The needle is a common scapegoat for faults that live elsewhere.
Sourcing and Quality Considerations
Buy ignition needles from the burner OEM or an authorized distributor whenever possible. They can confirm the alloy, tip geometry, and mounting dimensions against your serial number. For obsolete burners, specialty combustion-parts distributors often stock cross-referenced equivalents — but ask for the material specification in writing, not just a “fits your burner” assurance.
Keep a spare needle on the shelf. They’re inexpensive relative to the cost of an unplanned shutdown, and having the correct part on hand turns a multi-day outage into a 30-minute swap.
For combustion safety requirements that govern how ignition systems must perform, the relevant guidance comes from standards bodies such as the National Fire Protection Association, whose NFPA 86 standard covers ovens and furnaces and is the reference most industrial burner technicians work from.
Related guides
- Industrial Infrared Gas Burner Troubleshooting Guide: Fixes
- How to Maintain an Industrial Infrared Gas Burner: Expert Tips
- How Does an Infrared Burner Ignition System Work?
Frequently Asked Questions
How do I know what size ignition needle I need?
Start with the burner’s OEM part number from the manual or nameplate. If it’s unavailable, measure the old needle’s insertion depth, rod diameter, tip shape, bend angle, and thread size, then match all of those — not just length — when ordering a replacement.
What is the correct spark gap for an industrial burner?
Most industrial burners specify a gap between 1/8 in. and 3/16 in., but this varies by burner and transformer. Always use the OEM’s specified gap, set with a feeler gauge. A gap that’s too wide won’t spark; too narrow gives a weak spark.
Can I use a stainless steel needle in a high-temperature burner?
Usually not. Stainless steel is typically limited to around 1,400°F. Above that, use Inconel, Kanthal, or silicon carbide, depending on the temperature and atmosphere. Using the wrong alloy causes rapid tip erosion and frequent lockouts.
Why does my new ignition needle fail within weeks?
The most common causes are an incorrect spark gap, the wrong alloy for the temperature, a cracked or carbon-tracked insulator, or a mismatched spark-to-ground configuration. Check all four before assuming the needle itself is defective.
How often should ignition needles be replaced?
There’s no fixed interval — replacement is condition-based. Inspect needles at every burner service and replace them when the tip is eroded, the insulator is cracked or tracked, or the rod is bent. Keeping a spare on hand avoids extended downtime.
Are aftermarket ignition needles as good as OEM parts?
Sometimes, but quality varies widely. Aftermarket needles may differ in alloy, tip geometry, or dimensions even when listed as equivalents. Buy OEM or from a distributor who will provide the material specification in writing.
Making the Final Call
Choosing an ignition needle is a specification exercise, not a guessing game: confirm the alloy against your burner’s temperature, match the tip geometry and gap, verify the insulator rating, and get the mounting style and seal exactly right.
When in doubt, go back to the OEM part number and measure the old needle before you discard it. Your next step is simple — pull your burner’s nameplate data and parts manual, write down the four specifications above, and order a spare at the same time you order the replacement.
Get the Right Parts from Hengyi Burners
Hengyi Burners manufactures infrared gas burners and burner components in Zhaoqing, China. We supply ignition needles and ignition controllers matched to our infrared gas burners. Contact our team with your fuel type, supply pressure and heating area, and we will recommend a setup and send a quote.
One thought on “How to Choose an Ignition Needle for an Industrial Gas Burner”