

An infrared burner ignition system lights the burner by using a small electrical spark or a hot-surface element to ignite gas at the burner’s surface, then proves the flame is present with a sensor before opening the main gas valve to keep it running. In practice, the sequence is controlled by a module or control board that runs a fixed startup routine: call for heat, safety check, ignition, flame sensing, and full gas flow. If any step fails, the system shuts the gas off and either retries or locks out.
Key Takeaways
- An infrared burner doesn’t use a pilot flame in most modern designs; it uses direct spark ignition or a hot-surface igniter.
- In addition, the control module always proves flame before it lets the main burner run at full gas pressure.
- A flame sensor (flame rectification rod or photocell) is what tells the board the burner is actually lit.
- Most no-light problems trace back to a dirty emitter surface, a cracked igniter, a weak spark gap, or a blocked gas orifice.
- You can test an igniter and sensor with a multimeter, but gas valve work should go to a licensed technician.
- A typical infrared burner ignition sequence runs 15 to 45 seconds from call for heat to steady flame.
What an Infrared Burner Actually Is
An infrared burner, sometimes called a radiant burner, heats a porous emitter surface instead of relying on open flame alone. First, gas flows into a plenum, mixes with air, and burns across a ceramic, metal mesh, or perforated tile surface. As a result, that surface glows orange and radiates heat in the infrared band directly to whatever sits in front of it.
This matters for ignition because the burner surface is where the flame must anchor. For example, a regular blue-flame burner can tolerate a flame that lifts or drifts. In contrast, an infrared burner needs the flame to sit tight against the emitter, or the surface won’t glow evenly and hot spots can crack the tile.
Common places you find these burners:
- Patio heaters and outdoor radiant heaters
- Commercial broilers and salamanders in restaurants
- Garage and shop heaters with ceramic plaques
- Gas grills with infrared sear zones
- Industrial drying and curing ovens
In fact, each of these uses roughly the same ignition logic, though the hardware varies.
The Main Ignition Methods Compared
There are three ignition approaches you’ll run into. The table below breaks down how they differ.
| Method | How It Lights the Burner | Typical Use | Main Weak Point |
|---|---|---|---|
| Direct spark ignition (DSI) | Control board sends high voltage to a spark electrode at the burner | Patio heaters, commercial broilers | Electrode cracks or gap drifts |
| Hot-surface ignition (HSI) | A silicon nitride or carbide element glows red hot, gas hits it and lights | Grills, ovens, some heaters | Element frays and burns out |
| Standing pilot | A small permanent flame lights the main burner on demand | Older equipment only | Pilot blows out, wastes gas |
Direct spark is the most common on infrared equipment because it’s cheap and fast. By contrast, hot-surface ignition is quieter and doesn’t produce a clicking sound, which is why it shows up in residential-style grills. Meanwhile, standing pilots are largely obsolete on infrared burners because the emitter surface runs hot and a pilot flame sitting nearby tends to get cooked.
Pro Tip: If your burner clicks repeatedly but never lights, the problem is almost always spark-related, not gas-related. Check the electrode before you touch the gas line.
Step-by-Step: The Ignition Sequence
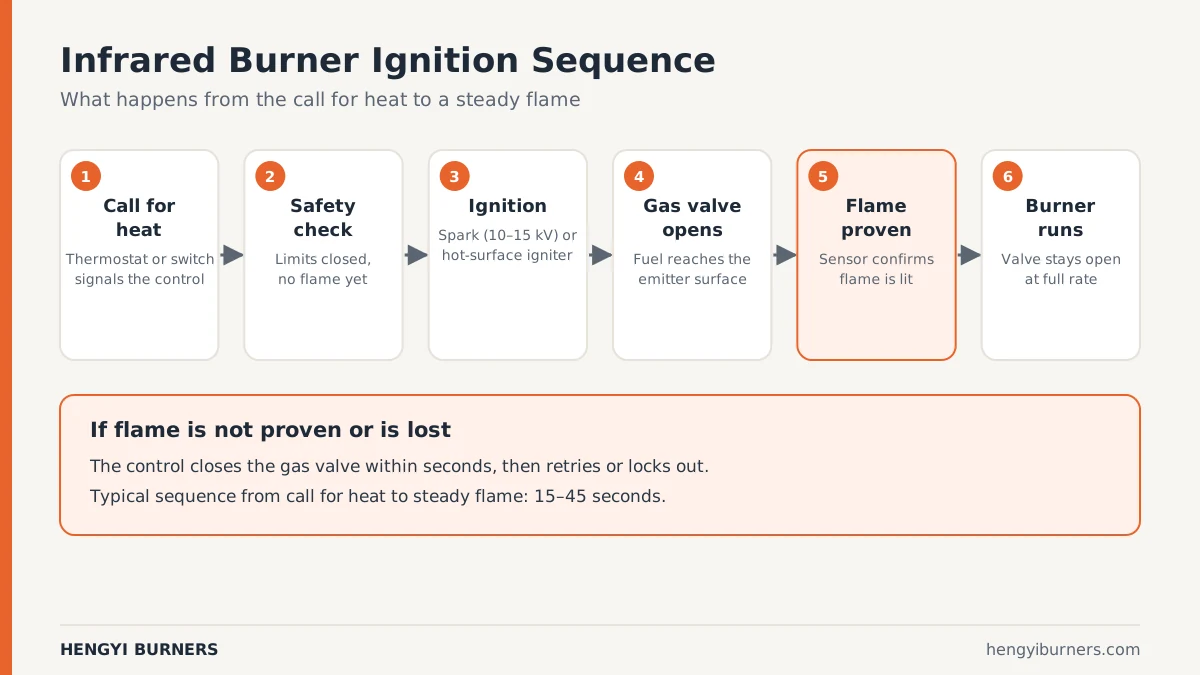
Here is what happens inside a typical infrared burner from the moment you turn it on.
Step 1: Call for Heat
A thermostat, timer, or manual switch sends a low-voltage signal (usually 24 volts AC) to the control module. On a patio heater this is just the knob you turned. On a commercial broiler it may be a thermostat or a building control system.
Step 2: Safety Check
Next, the module checks that the flame sensor reads “no flame” and that any limit switches, rollout switches, or pressure switches are closed. If a safety switch is open, the sequence stops here and nothing else happens. This is why a heater with a tripped high-limit switch won’t even attempt to spark.
Step 3: Ignition Begins
Then the module sends high voltage (typically 10,000 to 15,000 volts) to the spark electrode, or it energizes the hot-surface igniter and waits for it to glow. You hear a rapid clicking on spark systems. Hot-surface systems are silent.
Step 4: Gas Valve Opens
After a short pre-purge, the module opens the gas valve. As a result, gas flows into the burner plenum, mixes with air, and reaches the emitter surface where the spark or glowing element is waiting.
Step 5: Flame Proves Itself
Next, the flame sensor detects the flame. On most systems this is flame rectification: the flame conducts a tiny DC current back to the board. On some infrared equipment it’s a photocell that sees the glow. Either way, the board now knows the burner is lit.
Step 6: Main Burner Runs
Once flame is proven, the module keeps the gas valve open and the burner runs at full rate. If flame is lost at any point, the module closes the gas valve within a second or two and either retries or locks out.
What the Flame Sensor Does
The flame sensor is the safety heart of the system. Without it, a burner could dump gas into a space with no flame and create an explosion hazard. This is why every modern gas appliance sold in the US must meet safety standards enforced by the U.S. Consumer Product Safety Commission and tested to ANSI Z21 standards.
There are two sensor types you’ll see:
- Flame rectification rod — a metal rod sitting in the flame path. In other words, the flame acts as a diode and passes a small current. If the rod gets coated with carbon or oxide, the signal weakens and the board shuts the burner down.
- Photocell or UV sensor — used on larger industrial infrared burners. In this case, it watches for the light signature of the flame.
In fact, a weak flame signal is one of the most common causes of a burner that lights and then shuts off after a few seconds. Fortunately, cleaning the rod with fine steel wool often fixes it.
Common Failure Points and Fixes
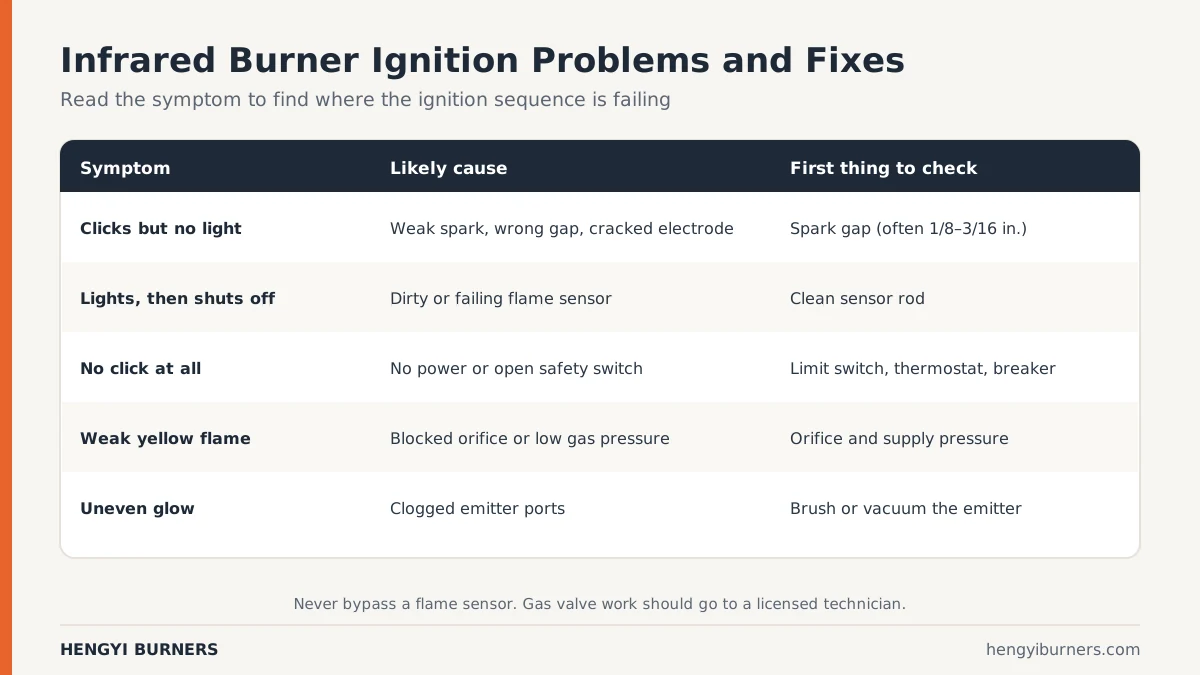
The table below maps symptoms to likely causes.
| Symptom | Likely Cause | First Thing to Check |
|---|---|---|
| Clicks but no light | Weak spark, wrong gap, cracked electrode | Spark gap (usually 1/8 to 3/16 inch) |
| Lights then shuts off in seconds | Dirty or failing flame sensor | Clean sensor rod with steel wool |
| No click at all | No power to module, open safety switch | Limit switch, thermostat, breaker |
| Weak yellow flame | Blocked orifice or low gas pressure | Orifice and supply pressure |
| Burner glows unevenly | Clogged emitter ports | Brush or vacuum the emitter surface |
Warning: Never bypass a flame sensor or hold a gas valve open manually to “test” a burner. After all, that removes the one safety device preventing a gas explosion.
How to Test an Igniter and Sensor
You can do basic diagnostics with a multimeter before calling a technician.
- Kill the gas supply and unplug the unit.
- Remove the burner access panel to expose the electrode and sensor.
- Inspect the spark electrode for cracks in the ceramic insulator. Otherwise, a cracked insulator lets spark arc to ground instead of across the gap.
- Set the spark gap to the manufacturer’s spec, usually 1/8 to 3/16 inch.
- Check the flame sensor rod for carbon buildup and clean it with fine steel wool.
- Reassemble, restore gas, and watch the sequence. Then count the seconds between the click and the light.
If the module clicks, gas flows, and the burner still won’t light, the problem is usually gas-side: a blocked orifice, a stuck valve, or low supply pressure. Therefore, those need a manometer and a licensed technician.
Maintaining Your Infrared Burner
Regular maintenance prevents most ignition failures. A few habits go a long way:
- Brush the emitter surface after every few uses to keep ports open.
- Check the spark gap once a season.
- Clean the flame sensor at the start of heating season.
- Inspect the gas hose and regulator for cracks, especially on outdoor heaters.
- Keep the burner dry — moisture in the plenum causes hard starting.
On commercial broilers, a weekly deep clean of the burner compartment is standard practice because grease and carbon block the emitter ports and foul the sensor.
When to Call a Technician
Some jobs aren’t DIY. Call a licensed gas technician if:
- You smell gas at any point.
- The gas valve itself is suspected of sticking.
- Supply pressure needs adjustment.
- The control module has failed and needs replacement.
- The burner is part of a commercial cooking line under health or fire code.
Gas work carries real risk. A technician has the manometer, the leak detector, and the insurance to do it safely.
Related guides
- How Infrared Burners Improve Powder Coating Curing
- Industrial Infrared Gas Burner Troubleshooting Guide: Fixes
- How Honeycomb Ceramic Burner Plates Work in Infrared Heating
Frequently Asked Questions
How long should an infrared burner take to light?
Most systems light within 15 to 45 seconds of the call for heat. Spark systems typically light in 5 to 15 seconds once gas reaches the burner. However, hot-surface systems take longer because the element must glow first. If yours takes more than a minute, something is wrong.
Why does my infrared burner click but not light?
The spark is jumping to the wrong place or gas isn’t reaching the burner. First, check the spark gap first, then look for a cracked electrode insulator. If those are fine, the gas orifice or valve is likely blocked. Don’t keep clicking it repeatedly with gas flowing.
Can I replace the igniter myself?
On most outdoor patio heaters and grills, yes. After all, the igniter is a plug-in or screw-in part and the job takes 20 to 30 minutes. On commercial or built-in equipment, check your warranty and local code first. Still, any work past the gas valve should be done by a licensed technician.
What is flame rectification?
It’s the method most gas controls use to prove a flame exists. Specifically, the flame conducts a small DC current between the burner and the sensor rod. Then the control board reads that current. If it drops below a threshold, the board shuts the gas off. It’s simple, reliable, and fail-safe.
Why does my burner light and then go out?
A weak flame signal is the usual cause. Usually, the sensor rod is dirty, coated, or out of position. Therefore, clean it with fine steel wool and make sure it sits in the flame path. If the problem persists, the control module or the sensor itself may have failed.
Do infrared burners need a pilot light?
No. Instead, almost all modern infrared burners use direct spark or hot-surface ignition. In addition, a standing pilot wastes gas and gets cooked by the hot emitter surface. If your unit has a pilot, it’s an older design.
What to Do Next
Grab your owner’s manual and find the ignition sequence diagram for your specific burner. Next, compare it against the steps above, then run a live test with the gas on and watch where the sequence stops. As a result, that single observation tells you whether you have a spark problem, a gas problem, or a sensor problem — and it tells a technician exactly where to start if you hand the job off.
Get the Right Parts from Hengyi Burners
Hengyi Burners manufactures infrared gas burners and burner components in Zhaoqing, China. We supply ignition needles and ignition controllers matched to our infrared gas burners. Contact our team with your fuel type, supply pressure and heating area, and we will recommend a setup and send a quote.
3 thoughts on “How Does an Infrared Burner Ignition System Work?”